USSD Service Documentation
How it works
This documentation provides an overview of the USSD service, its features, and how it works. The USSD service allows farmers to purchase agricultural products using their mobile phones through a USSD interface. The service interacts with a customer service to identify the farmer and allows them to select items from a list of available products. Customers can access the service by dialing *606# and following the prompts to enter their personal details and select the desired quantity of bags.After selecting the items and making a payment via MPESA, a voucher code is generated and sent to the customer via SMS which can be redeemed at participating agrovets.
Getting Started
To use the USSD Service, a farmer needs to have access to a mobile phone with USSD capabilities and sufficient credit to complete the transaction. The following steps should be followed:
- Dial *606# on your mobile phone
- Follow the prompts to enter your personal details (first name, last name, and ID number)
- Enter the desired quantity of bags (up to 6 bags per customer)
- Review the cart and proceed to checkout
- Make payment for the total amount displayed
- Wait for an SMS notification with your voucher code
- Visit nearest Participating stockist to pick items
Customer Limits
Each customer is limited to a maximum of x Kilograms per transaction. This limit is enforced by the system administrator.
Payment
Payment for the agricultural products is made through mobile money (MPESA) or any other available payment option. The total amount to be paid is displayed at checkout and includes the cost of the products plus any transaction fees or taxes that may apply.
Collection of Products
After making payment, the customer will receive an SMS notification with their voucher code. This code should be presented at a participating agrovet to collect the items. The customer is required to collect the items within a specified period, as indicated in the SMS notification. Failure to collect the items within the specified period may result in the cancellation of the voucher code.
Installation Guide
Before we begin, please make sure you have the following prerequisites:
- A Google Cloud Platform (GCP) account
- A project set up on GCP
- A service account with the necessary permissions to create resources in GCP
- Terraform installed on your local machine
- A Bitbucket repository to host your code
- Docker installed on your local machine
Architecture
This guide will help you install workflow service built on Laravel, hosted on GCP, and deployed to GKE using terraform. The service has three branches, namely staging, qa, and master each pointing to a different environment. We also use Git conventions for commits and host our repository on Bitbucket.
Installing Locally
If you want to install the service locally for development purposes, follow these steps:
Clone the repository from Bitbucket using Git. You can use the following command:
Checkout the branch you want to work on. We have three branches: staging, qa, and master.
The staging branch points to the staging environment, qa points to qa environment and master points to production environment.
Install the dependencies using Composer. Make sure you are in the root directory of the project, where the composer.json is located.
Create a .env file by copying the .env.example file and filling in the necessary environment variables.
Generate the application key.
Set up database: Next, you need to set up a database for your service. Open up the .env file in the root of your app and fill in the details for your database connection. For example:
DB_CONNECTION=mysql
DB_HOST=127.0.0.1
DB_PORT=3306
DB_DATABASE=ipos_db
DB_USERNAME=root
DB_PASSWORD=
Note: You'll need to create a new database in your MySQL server first before you can connect to it.
Once you've filled in the details for your database connection, run the following command in your terminal:
This will create the necessary tables in your database.
Seeding Data
This will seed the database with the necessary data.
Serve the application using the following command:
You should now be able to access the service at http://localhost:8000.
Running Tests
Before you run tests, get Bearer token from auth service and set it in your .env file.
To run your tests, run the following command in your terminal:
This will run all the tests in your tests directory. If any of the tests fail, you'll see an error message in your terminal.
GKE installation
Clone the repository from Bitbucket using Git. You can use the following command:
Checkout the branch you want to install. We have three branches: staging, qa, and master. The staging branch points to the staging environment, qa points to qa environment and master points to production environment.
Build the Docker image for the service. Make sure you are in the root directory of the project, where the Dockerfile is located.
Push the Docker image to Google Container Registry. Replace
docker tag <image-name> gcr.io/<project-id>/<image-name>
docker push gcr.io/<project-id>/<image-name>
Deploy the service to GKE. Replace
kubectl create deployment <service-name> --image=gcr.io/<project-id>/<image-name>
kubectl expose deployment <service-name> --type=LoadBalancer --port 80 --target-port 80
Wait for the load balancer IP to be assigned. You can check the status of the service using the following command:
Git Conventions
We use the conventional commits specification for our Git commits. Please make sure to follow these guidelines when making commits.
- Use present tense, imperative mood (e.g. "add feature" instead of "Added feature").
- Keep commit messages short and descriptive.
- Separate the subject from the body with a blank line.
- Use bullet points to list the changes made in the commit.
Commit Types
- build: Changes that affect the build system or external dependencies (example scopes: gulp, npm)
- ci: Changes to CI configuration files and scripts (example scopes: Travis, Circle)
- chore: Changes which doesn't change source code or tests e.g. changes to the build process, auxiliary tools, libraries
- docs: Documentation only changes
- feat: A new feature
- fix: A bug fix
- perf: A code change that improves performance
- refactor: A code change that neither fixes a bug nor adds a feature
- revert: Revert something
- style: Changes that do not affect the meaning of the code (white-space, formatting, missing semi-colons, etc)
- test: Adding missing tests or correcting existing tests
API Documentation
The USSD Purchase Service API is a RESTful API designed to allow frontend developers to interact with the USSD Purchase Service system. The API provides endpoints for managing carts, customer lists, products, customer limits, product groups, and sending SMS messages. The API also provides endpoints for handling SMS delivery report webhooks.
Base URL
All endpoints have the base URL of https://workflow-service.test/api/v1/workflow/
Authentication
All endpoints require authentication via a Bearer Token, which is provided by the Auth Service system.
Tip: All API Endpoints are available on the Swagger Section
Sample API Endpoints
Carts
The carts endpoints fetches a cart and its items.
GET /carts/{id}
Retrieve the contents of a customer's cart.
Request Parameters
id: The ID of the cart that should be retrieved.
Response
A JSON object containing the contents of the cart.
Example Request
Example Response
{
  "data": {
    "id": "3",
    "name": "test",
    "paymentStatus": 0,
    "voucherCode": null,
    "receiptCode": null,
    "customerId": null,
    "amount": "5.00",
    "paidAmount": "0.00",
    "customerPhone": null,
    "paymentReceiptPayload": null,
    "items": [],
    "shop": {
      "id": 2,
      "name": "Berurtany Agrovet ",
      "contactPerson": null,
      "contactPhone": "712511777",
      "town": null
    }
  }
}
POST /carts
Create a new cart for a customer.
Request Body
A JSON object containing the product ID and quantity of the items to be added to the cart.
{
  "cartName": "232121123",
  "voucherCode": "",
  "receiptCode": "",
  "customerId": "1",
  "customerPhone": "",
  "shopId": "2",
  "amount": "5",
  "paidAt": "",
  "paymentReceiptPayload": "",
  "paymentStatus": "0",
  "items": [
    {
      "productId": 1,
      "sellingPrice": 30,
      "amount": 20,
      "quantity": 1
    },
    {
      "productId": 1,
      "sellingPrice": 40,
      "amount": 10,
      "quantity": 1
    }
  ]
}
Response
A JSON object confirming the items added to the customer's cart.
Example Request
POST https://yourapi.com/api/v1/workflow/carts
Authorization: Bearer {TOKEN}
Content-Type: application/json
{
"cartName": "CART001",
"voucherCode": "",
...
}
Example Response
{
  "message": "Cart created successfully",
  "id": 19,
  "data": {
    "id": "19",
    "name": "232121123",
    "paymentStatus": "0",
    "voucherCode": null,
    "receiptCode": null,
    "customerId": null,
    "amount": "5.00",
    "paidAmount": null,
    "customerPhone": null,
    "paymentReceiptPayload": null,
    "items": [
      {
        "id": 27,
        "productName": "DAP",
        "productTypeText": "KG",
        "productTypeNumeric": 50,
        "productCode": "OCP",
        "quantity": 1,
        "amount": 20
      },
      {
        "id": 28,
        "productName": "DAP",
        "productTypeText": "KG",
        "productTypeNumeric": 50,
        "productCode": "OCP",
        "quantity": 1,
        "amount": 10
      }
    ],
    "shop": {
      "id": 2,
      "name": "Berurtany Agrovet ",
      "contactPerson": null,
      "contactPhone": "712511777",
      "town": null
    }
  },
  "success": true
}
DELETE /carts/{id}
Remove an item from a customer's cart.
Request Parameters
id: The ID of the cart that should be deleted.
Response
A JSON object confirming the cart removed.
Example Request
Example Response
System Workflow
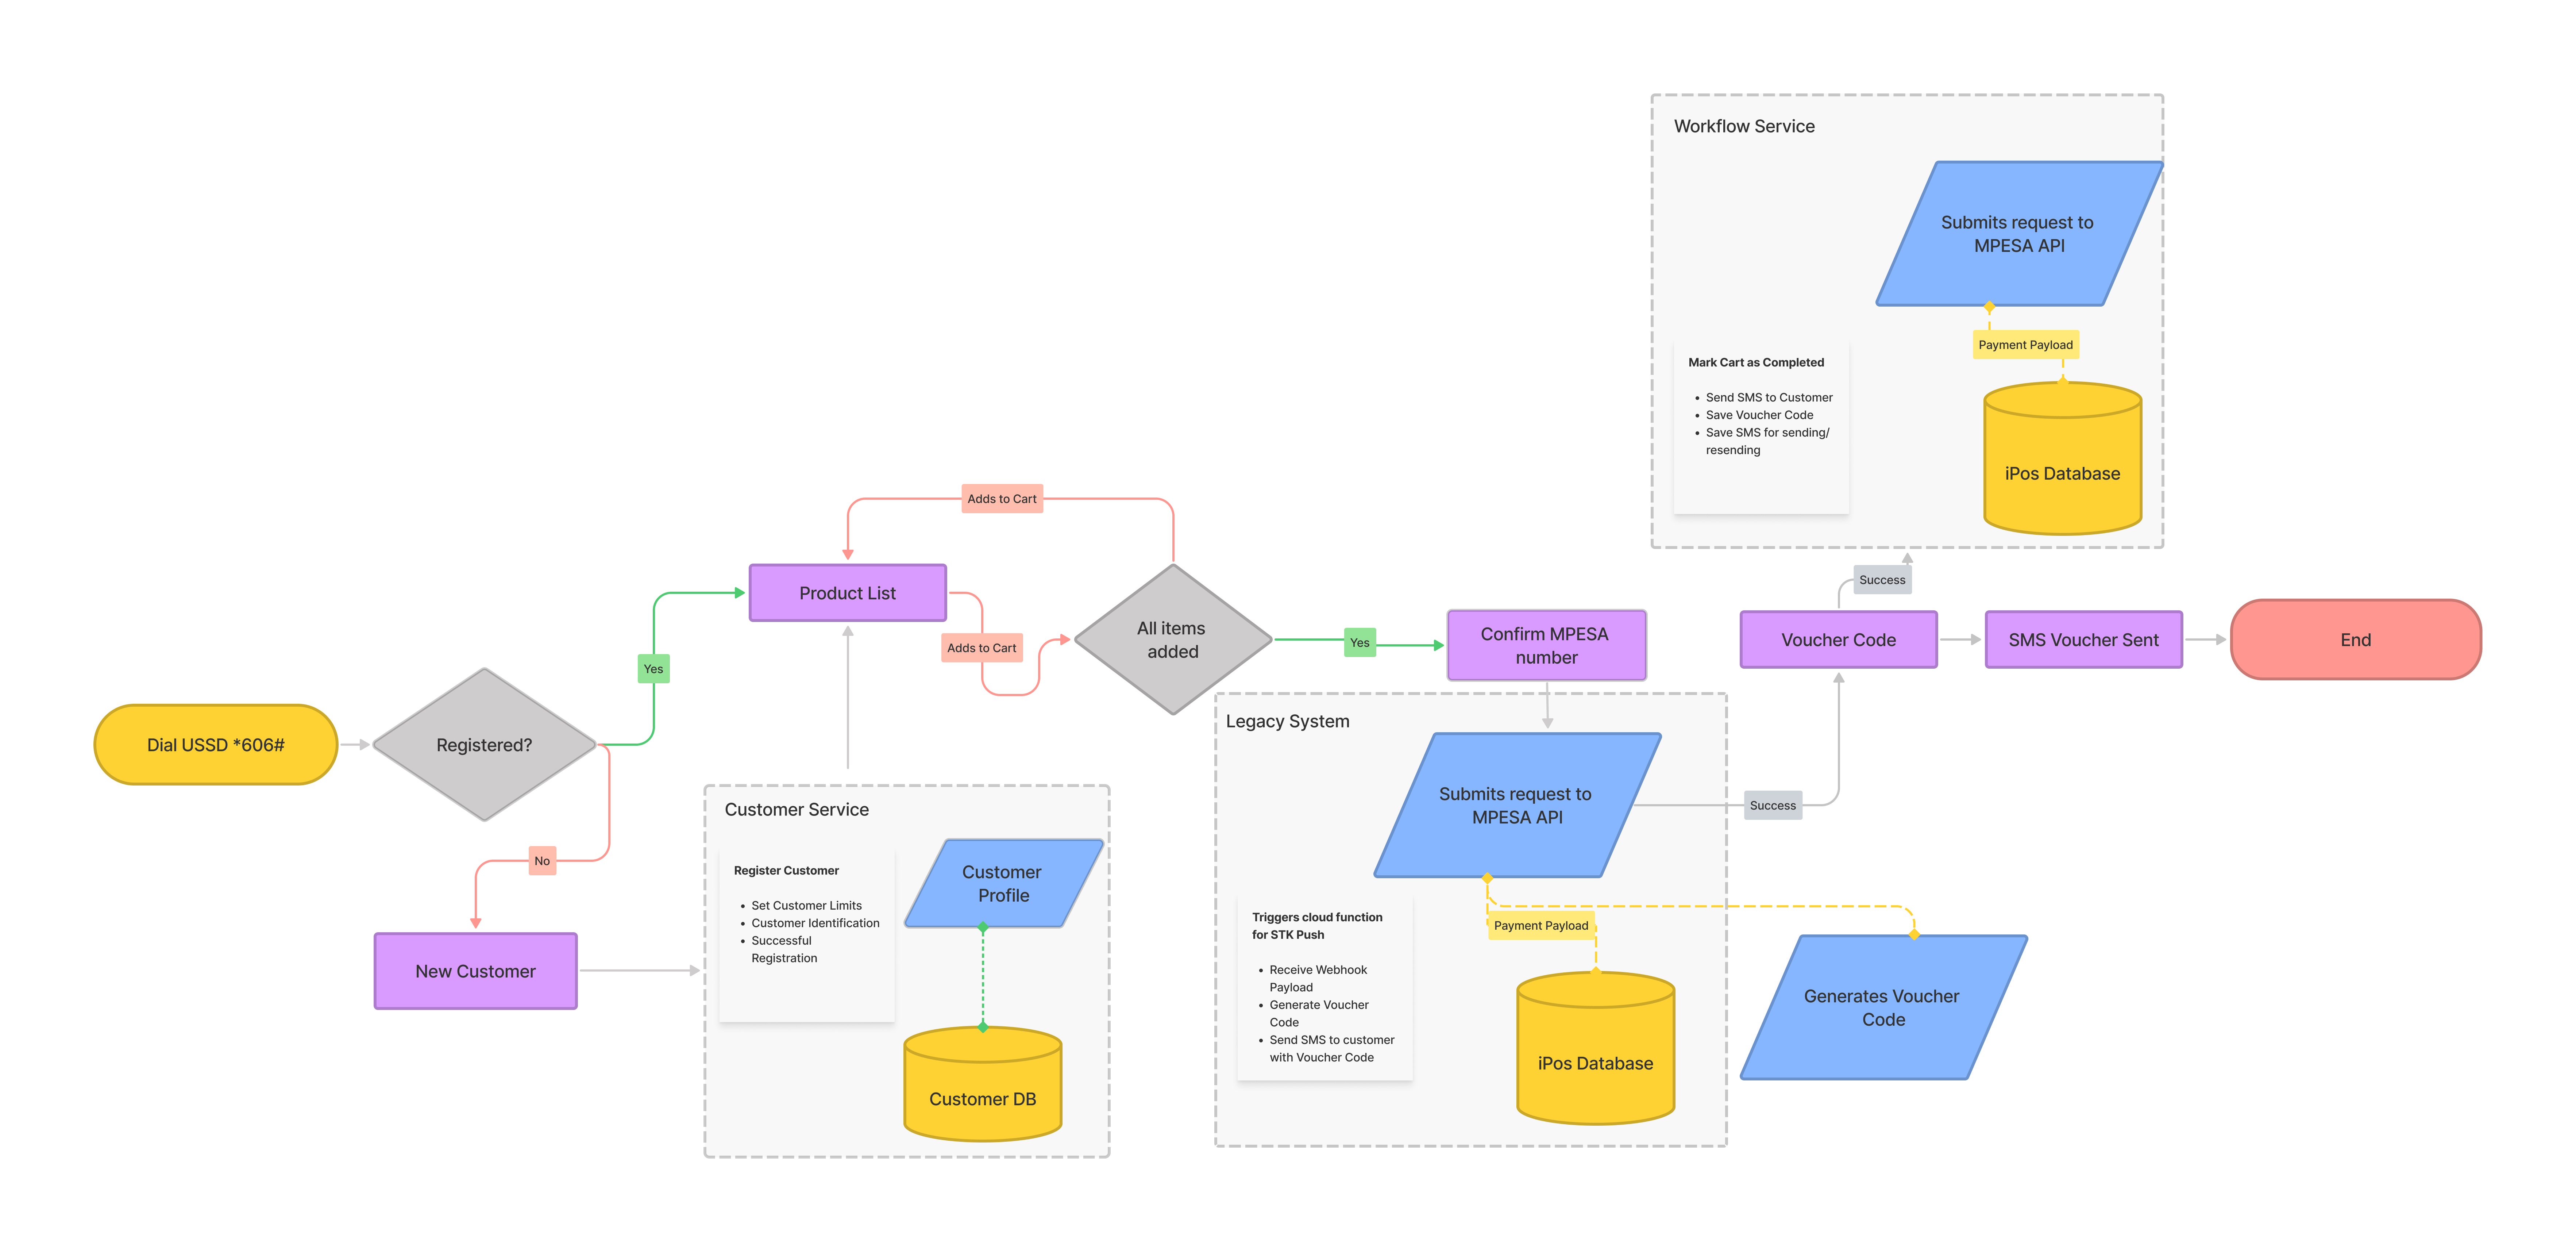
- Customer registration: When a farmer interacts with the USSD service, their account is created.
- Customer identification: A request is sent to the customer service to identify the farmer, and their customer ID is retrieved.
- Product selection: The farmer selects the items they need from a list of available products and adds them to their cart.
- Customer limit: There is a limit on the number of items a customer can purchase and the weight they are allowed to consume.
- Payment: After selecting the items, the farmer proceeds to pay via MPESA mobile payment.
- Payment completion: An STK is pushed to the customer's phone to complete payment.
- A webhook is received from MPESA to show that the payment was successful.
- Voucher code generation: After payment is received, a request is sent to the old system to generate a voucher code.
- SMS storage: The SMS containing the voucher code is stored in the database.
NB: There is a scheduled task to send unsent messages which contain the voucher code. - Item collection: After payment, the farmer can visit a participating agrovet to pick up their items.
- Cart clearing: The cart is cleared and marked as paid.
- SMS resending: There is an option to resend messages just in case a voucher was generated but not sent to the customer.
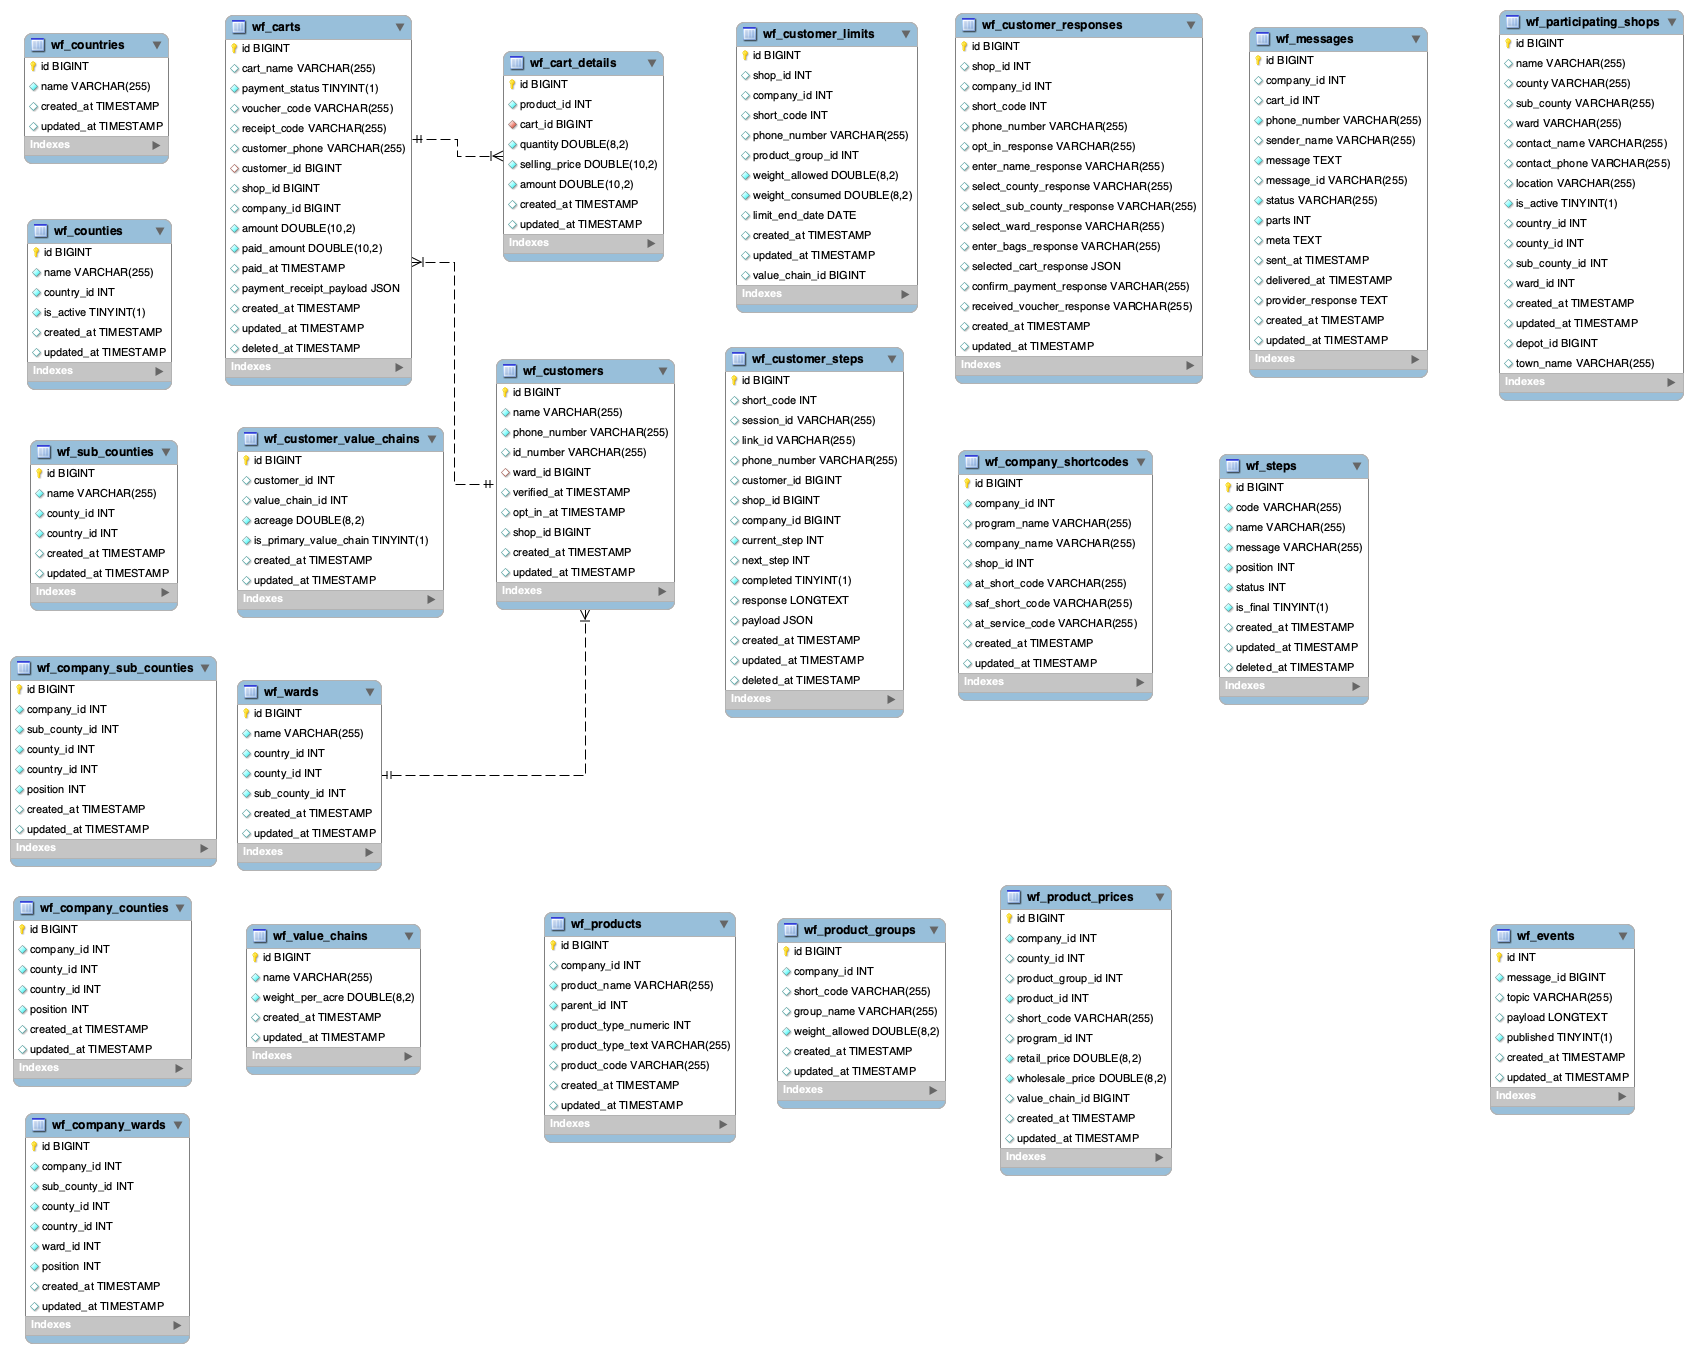
Database Structure
Conclusion
The USSD Service provides farmers with an easy and convenient way to purchase agricultural products using their mobile phones. By following the simple steps outlined in this documentation, farmers can easily register, select and purchase the desired quantity of bags/weight. We hope that this service will contribute to increased crop yields and improved livelihoods for farmers across the country.
Future Enhancements and Propositions
- Adding customer limits based on value chains and acreage
- Showing products based on county id
- Make USSD portal that can be availed to the different onboarded companies
- Add inventory tracking to USSD service - migrate from legacy system
- Add sales tracking to USSD service - migrate from legacy system
- Add message templates to the dashboard to allow companies to structure messages on their own
- Add a way to show status of voucher - migration from legacy system
- Redeemed
- Not redeemed
- Add reports