Inventory Service Documentation
How it works
This documentation provides an overview of the Inventory service, its features, and how it works. The inventory microservice is a standalone service that handles all operations related to inventory management. This service is responsible for maintaining the inventory levels of products and managing the stock movements such as receiving and transferring products. The inventory microservice is implemented using Laravel and utilizes a MySQL database to store and manage inventory data. The microservice communicates with other microservices in the iPos system through a RESTful API but it's subject to change in the future.
Authentication and Authorization
The inventory microservice uses JSON Web Tokens (JWT) for authentication and authorization. When a user logs in, they receive a JWT that they include in all subsequent requests to the inventory microservice. The inventory microservice validates the JWT and authorizes the user based on their role and permissions.
Error Handling
The inventory microservice returns error responses with appropriate status codes and error messages in case of invalid requests or errors in the inventory management operations.
Installation Guide
Before we begin, please make sure you have the following prerequisites:
- A Google Cloud Platform (GCP) account
- A project set up on GCP
- A service account with the necessary permissions to create resources in GCP
- Terraform installed on your local machine
- A Bitbucket repository to host your code
- Docker installed on your local machine
Architecture
This guide will help you install inventory service built on Laravel, hosted on GCP, and deployed to GKE using terraform. The service has three branches, namely staging, qa, and master each pointing to a different environment. We also use Git conventions for commits and host our repository on Bitbucket.
Installing Locally
If you want to install the service locally for development purposes, follow these steps:
Clone the repository from Bitbucket using Git. You can use the following command:
Checkout the branch you want to work on. We have three branches: staging, qa, and master.
The staging branch points to the staging environment, qa points to qa environment and master points to production environment.
Install the dependencies using Composer. Make sure you are in the root directory of the project, where the composer.json is located.
Create a .env file by copying the .env.example file and filling in the necessary environment variables.
Generate the application key.
Set up database: Next, you need to set up a database for your service. Open up the .env file in the root of your app and fill in the details for your database connection. For example:
DB_CONNECTION=mysql
DB_HOST=127.0.0.1
DB_PORT=3306
DB_DATABASE=ipos_db
DB_USERNAME=root
DB_PASSWORD=
Note: You'll need to create a new database in your MySQL server first before you can connect to it.
Once you've filled in the details for your database connection, run the following command in your terminal:
This will create the necessary tables in your database.
Seeding Data
This will seed the database with the necessary data.
Serve the application using the following command:
You should now be able to access the service at http://localhost:8000.
Running Tests
Before you run tests, get Bearer token from auth service and set it in your .env file.
To run your tests, run the following command in your terminal:
This will run all the tests in your tests directory. If any of the tests fail, you'll see an error message in your terminal.
GKE installation
Clone the repository from Bitbucket using Git. You can use the following command:
Checkout the branch you want to install. We have three branches: staging, qa, and master. The staging branch points to the staging environment, qa points to qa environment and master points to production environment.
Build the Docker image for the service. Make sure you are in the root directory of the project, where the Dockerfile is located.
Push the Docker image to Google Container Registry. Replace
docker tag <image-name> gcr.io/<project-id>/<image-name>
docker push gcr.io/<project-id>/<image-name>
Deploy the service to GKE. Replace
kubectl create deployment <service-name> --image=gcr.io/<project-id>/<image-name>
kubectl expose deployment <service-name> --type=LoadBalancer --port 80 --target-port 80
Wait for the load balancer IP to be assigned. You can check the status of the service using the following command:
Git Conventions
We use the conventional commits specification for our Git commits. Please make sure to follow these guidelines when making commits.
- Use present tense, imperative mood (e.g. "add feature" instead of "Added feature").
- Keep commit messages short and descriptive.
- Separate the subject from the body with a blank line.
- Use bullet points to list the changes made in the commit.
Commit Types
- build: Changes that affect the build system or external dependencies (example scopes: gulp, npm)
- ci: Changes to CI configuration files and scripts (example scopes: Travis, Circle)
- chore: Changes which doesn't change source code or tests e.g. changes to the build process, auxiliary tools, libraries
- docs: Documentation only changes
- feat: A new feature
- fix: A bug fix
- perf: A code change that improves performance
- refactor: A code change that neither fixes a bug nor adds a feature
- revert: Revert something
- style: Changes that do not affect the meaning of the code (white-space, formatting, missing semi-colons, etc)
- test: Adding missing tests or correcting existing tests
API Documentation
The Inventory Service API is a RESTful API designed to allow frontend developers to interact with the Service. The API provides endpoints for managing inventories,inventory transactions and stock levels.
Base URL
All endpoints have the base URL of https://inventory-service.test/api/v1/inventory/
Authentication
All endpoints require authentication via a Bearer Token, which is provided by the Auth Service system.
Tip: All API Endpoints are available on the Swagger Section
Sample API Endpoints
Inventory
The inventories endpoints fetches all inventories, creates a new inventory, updates an existing inventory and deletes an existing inventory.
GET /inventories/{id}
Retrieve the inventory with the given ID.
Request Parameters
id: The ID of the inventory to retrieve.
Response
A JSON object containing the contents of the inventory.
Example Request
Example Response
{
  "data": {
    "id": 18,
    "productId": 20,
    "shopId": 1,
    "companyId": 1,
    "inventoryTypeId": 1,
    "localId": "67e20861-8e69-4169-abf5-dc497fc51744",
    "isQuarantine": false,
    "productCost": 750,
    "shopWholesalePrice": 600,
    "shopRetailPrice": 800,
    "shopAgentPrice": 0,
    "inventoryQuantity": 5,
    "reorderQuantity": 1,
    "discountPercentage": 0,
    "createdBy": 1,
    "updatedBy": null,
    "deletedBy": null,
    "deletedAt": null,
    "createdAt": "2023-03-20T09:02:24.000000Z",
    "updatedAt": "2023-03-20T09:02:24.000000Z",
    "inventoryTypeName": "Normal",
    "bundles": []
  }
}
POST /inventories
Create a new inventory.
Request Body
A JSON object containing the inventory ID and the inventory details.
{
  "productId": 20,
  "companyId": 1,
  "newValue": 0,
  "oldValue": 0,
  "batchDetails": [
    {
      "productId": 20,
      "localId": "78afb87a-2787-4295-b5e3-fef8863aa739",
      "batchTypeId": 1,
      "batchNumber": "",
      "batchQuantity": "5",
      "unitCost": "750",
      "sellingPrice": "800",
      "shopBatches": [
        {
          "shopId": 11,
          "inventoryId": null,
          "localId": "ad400389-ecdb-4c3d-9732-26e7aecc28dc",
          "priority": 1,
          "initialQuantity": 0,
          "currentQuantity": "5",
          "isQuarantine": false,
          "activeStatus": true
        }
      ]
    }
  ],
  "localId": "7615100d-acb6-4991-baee-b4f788565ab7",
  "inventoryLocalId": "67e20861-8e69-4169-abf5-dc497fc51744",
  "transactionType": "INVENTORY_CREATION",
  "isQuarantine": false,
  "allowDeductFromInventory": true,
  "inventoryTypeId": 1,
  "shopId": 1,
  "discountPercentage": 0,
  "productCost": "750",
  "shopRetailPrice": "800",
  "shopWholesalePrice": "600",
  "transactionQuantity": "5",
  "reorderQuantity": "1"
}
Response
A JSON object confirming the creation of the inventory.
Example Request
POST https://yourapi.com/api/v1/inventory-service/inventories
Authorization: Bearer {TOKEN}
Content-Type: application/json
{
"productId": "2",
"shopId": "1",
...
}
Example Response
{
  "data": {
    "productId": 20,
    "shopId": 1,
    "companyId": 1,
    "inventoryTypeId": 1,
    "localId": "67e20861-8e69-4169-abf5-dc497fc51744",
    "isQuarantine": false,
    "productCost": "750",
    "shopWholesalePrice": "600",
    "shopRetailPrice": "800",
    "shopAgentPrice": 0,
    "inventoryQuantity": "5",
    "reorderQuantity": "1",
    "discountPercentage": 0,
    "createdBy": 1,
    "updatedAt": "2023-03-20T09:02:24.000000Z",
    "createdAt": "2023-03-20T09:02:24.000000Z",
    "id": 18
  }
}
DELETE /inventories/{id}
Remove an inventory from the system.
Request Parameters
id: The ID of the inventory to remove.
Response
A JSON object confirming the removal of the inventory.
Example Request
Example Response
Authentication Workflow

- The user sends a request to the Authentication Service with their credentials.
- The Authentication Service checks the credentials and returns a JWT token if the credentials are valid.
- The user sends a request to the Inventory Service with the JWT token in the Authorization header.
- The Inventory Service verifies the JWT token and returns the requested data if the token is valid.
- The inventory service sends a request to batch service to create a new batch.
- The batch service creates a new batch and returns the batch ID.
- The inventory service creates a new inventory and returns the inventory ID.
System Workflow
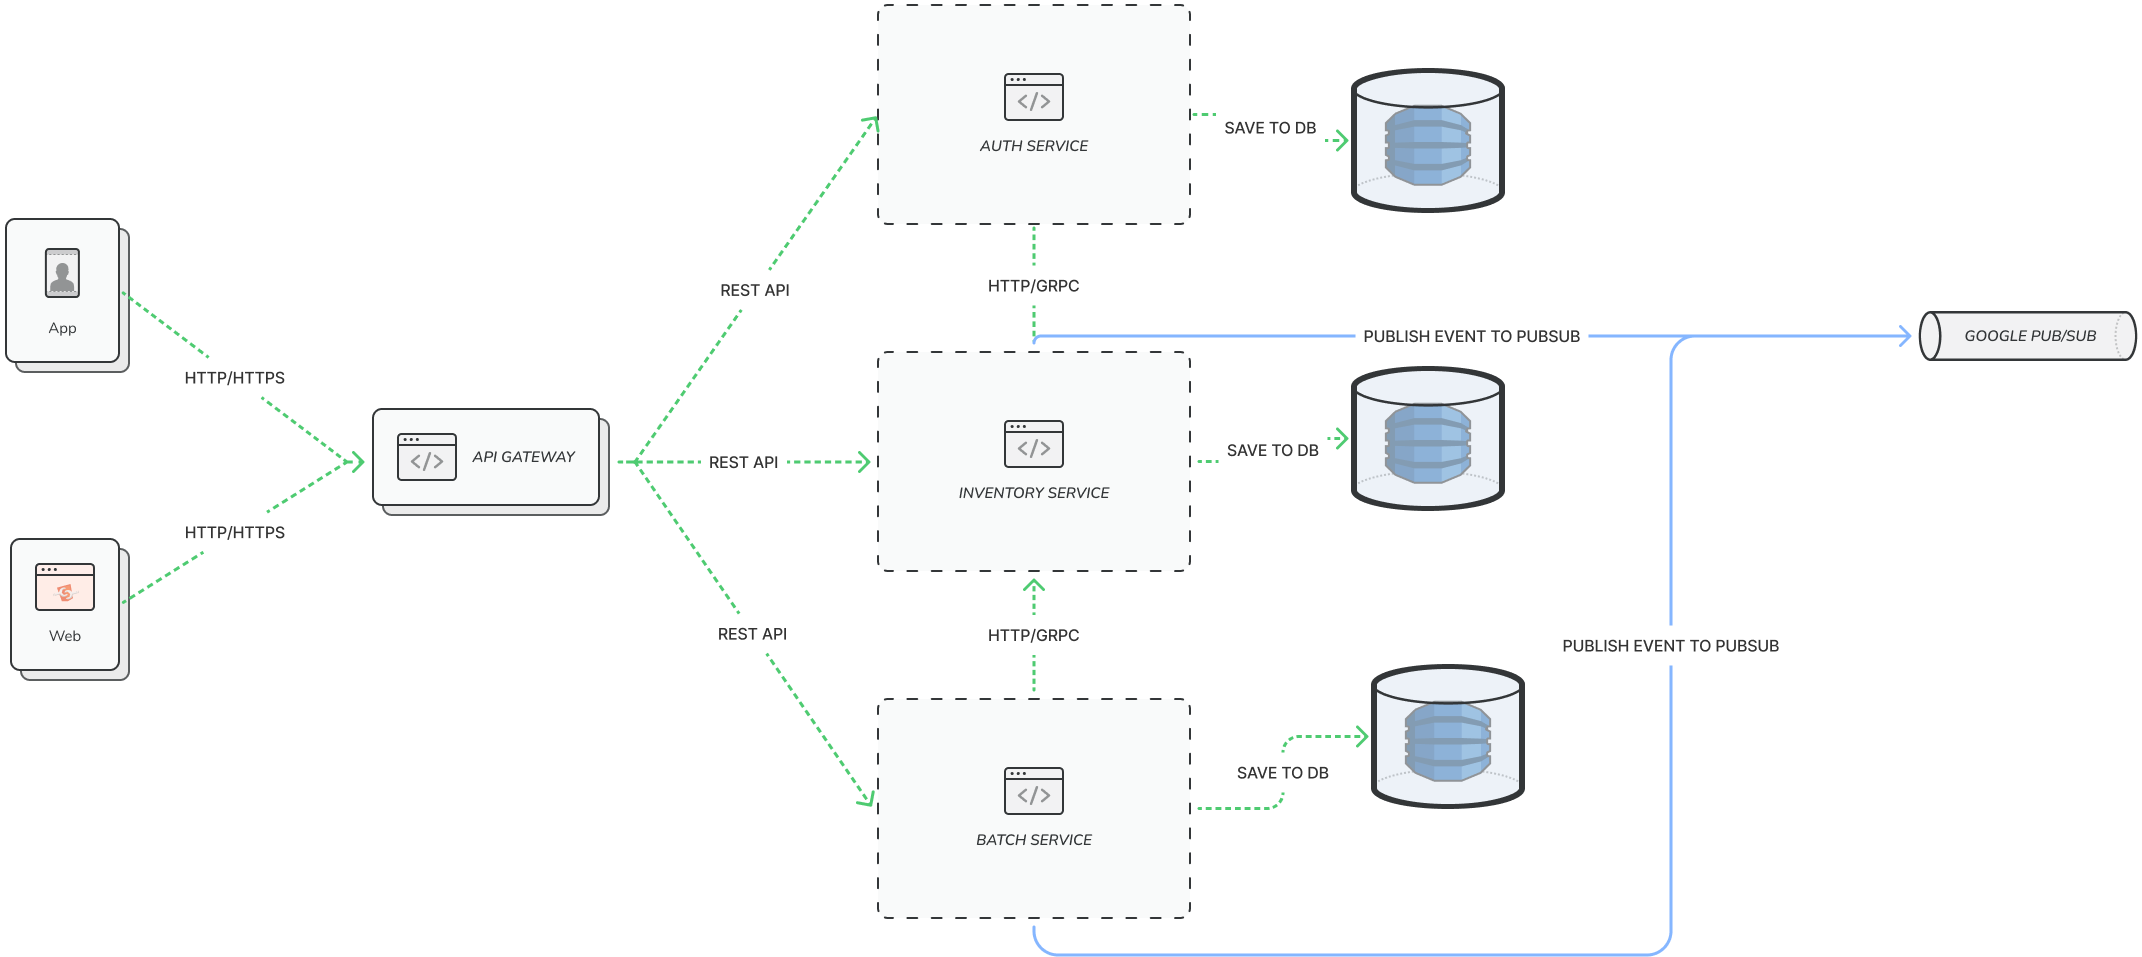
- User accesses the inventory using mobile or web application.
- Request is sent to Google API gateway.
- Google API gateway forwards the request to the inventory service.
- The inventory service checks the JWT token and returns the requested data if the token is valid.
- The inventory service sends a request to batch service to create a new batch.
- The batch service creates a new batch and returns the batch ID.
- The inventory service creates a new inventory and returns the inventory ID.
- After an inventory is created an event is published to the event bus (Google Pub/Sub).
- The event is consumed by the inventory service.
Database Structure
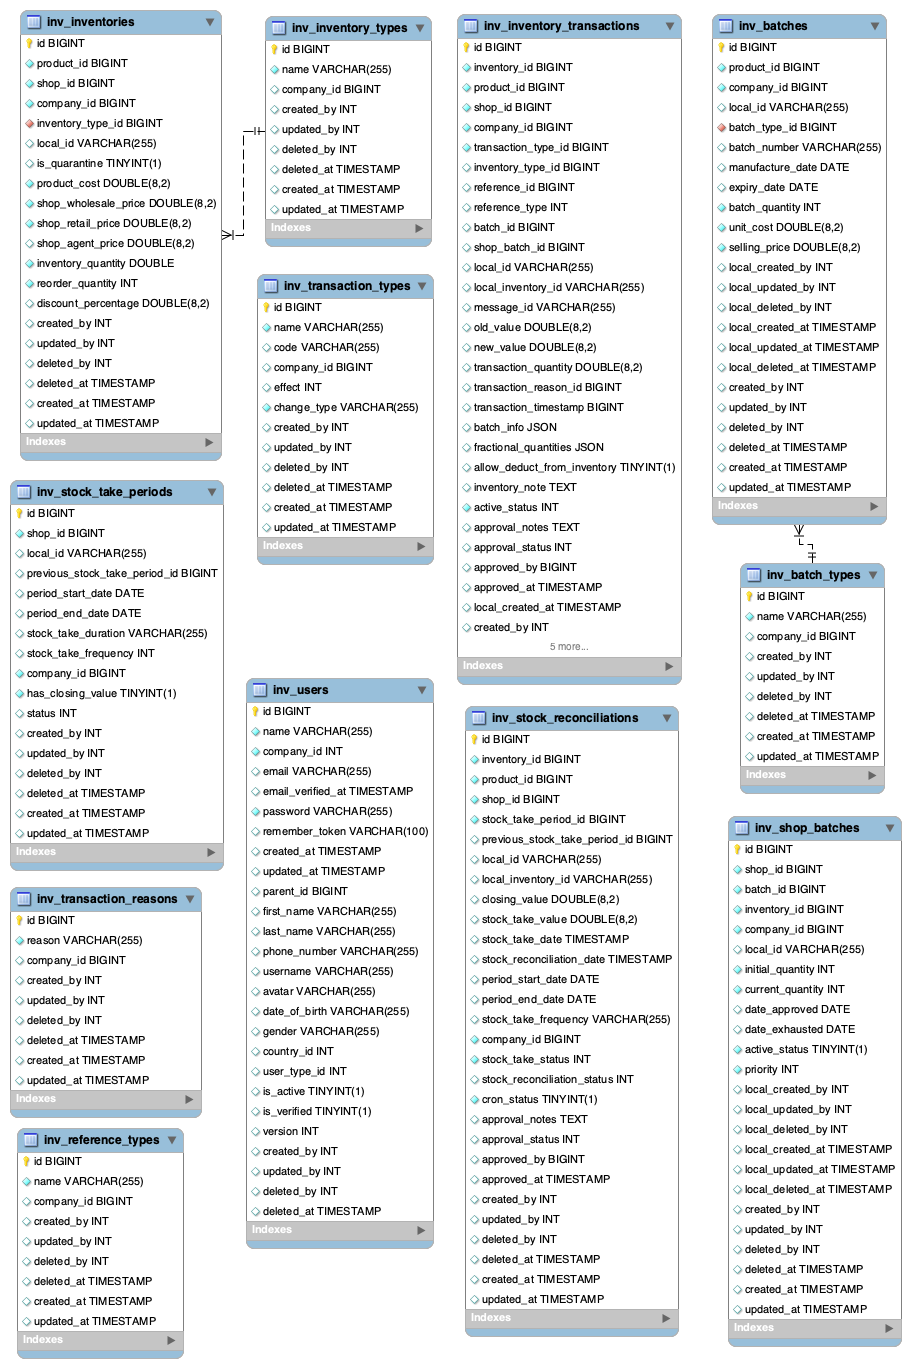
Conclusion
In this article, we have discussed the inventory service. We have discussed the architecture of the service, the authentication workflow, and the system workflow. We have also discussed the database structure of the service. In the next article, we will discuss the batch service.